How to Install Epson Event Manager Software Et 3760
Epson Event Manager Software Et 3760 is the software you need to install as an Epson product user as it helps you take advantage of the important features of your Epson products including ET3760 and products such as the Epson SureColor P400 Software And Driver.
The Epson Event Manager Software ET-3760 is the best Epson software for the Epson Et-3760 printer. The software help ET-3760 to provide high-quality prints with its Dye-Sublimation technology, which gives you vibrant colors and glossy finishes. It offers the ability to print in a wide range of ink colors and it has a powerful direct thermal printer.
However, it is necessary to know how to install Epson Event Manager Software ET-3760 to be able to use the ET-3760 printer to its optimal capacity. So, how do you install Epson Event Manager Software ET-3760? and of course, how do you solve the problems related to this printer? Read on.
Epson Event Manager Software ET-3760
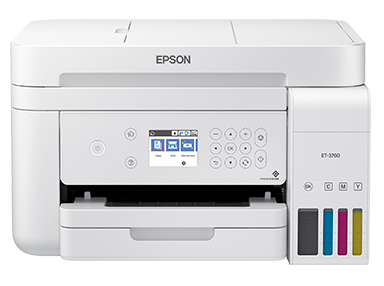
The Epson ET-3760 is a bulk-ink all-in-one printer that delivers impressive print quality and will keep your costs low. It is compatible with a wide range of different paper sizes. The EcoTank ET-3760 printer can print gorgeous print in a few minutes.
However, you need Epson Event Manager software to help you print effectively with your ET-3760. This software is generally used to support different kinds of Epson scanners and also helps in facilitating Scan as PDF, Scan to Email, Scan to Computer and much more.
The Epson Event Manager software runs in the background and you can access it via the system tray. The software listens to events that have triggered the scanner function of your Epson printers and all-in-one devices.
The Epson printers are disrupting the market because they offer high-quality printing at low costs. They have made it possible for companies to spend less on their printing services while still getting high-quality prints and professional-looking documents.
The Epson ET-3760 is very easy to use as it has both Wi-Fi and Ethernet connectivity, as well as a USB port that can be used for printing from mobile devices or external storage drives.
How To Install Epson Event Manager Software ET-3760
The Epson ET-3760 is a high-end printer for businesses and home use. The device can handle both wireless and wired connections. In this article, we will show you how to download and install the correct driver for your printer. Once you have completed these steps, you should be able to start using your Epson ET-3760 right away.
RELATED: 7 Best RIP Software – Easy To Use
Steps To Setup Epson Event Manager Software Et-3760
To get the best of your Epson device, you need to install Epson Event Manager Software Et-3760. To download it, go to the Downloads tab for your product to download it and install.
To avoid problems with installation, disable software that can block communication between your computer and printer such as Antivirus, firewall and Utilities.
- Install Epson Event Manager software. You must restart your computer once you have installed Epson Event Manager the first time to allow the software to work.
- If your Windows Firewall or Firewall application is still on, make an exception for Epson Event Manager software in the Firewall settings by clicking Start>Control Panel>Security Center or Security> Windows Firewall. Then click on the Exception tab or Change Settings. Then click the Add Program and choose Event Manager from the list. Click OK and confirm the Event Manager check box is selected in the Programs and Services and select OK.
- Launch the Epson Event Manager software and select Epson product and scanner. Click on Start>Programs or All Programs> Epson Software> Event Manager. Then click on the Button Settings to set all related settings that allow you to use Epson Scan and then click on Close.
- Click on the Start or Windows icon >Control Panel>Scanners and Cameras or Devices and Printers
- Right-click on the name of your product and click Properties.
- Click on the Events tab
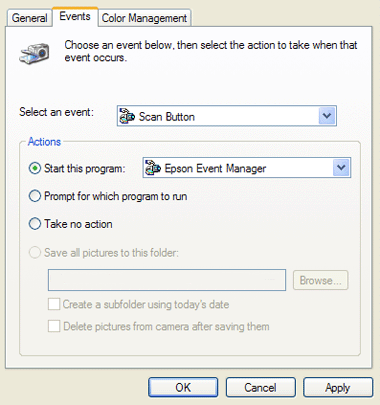
- Choose Scan Button for Select an event
- Choose Epson Event Manager for Start this program
- Click on Apply
- Click on OK
Now, try using Scan to PDF, Scan to Email or Scan to PC features. Be sure to have all the software you disabled earlier enabled now.
Once installed, the software will be available on your PC. You can then run it to get the most out of your new Epson printer. Download the Epson ET-3760 driver from the official manufacturer’s website. To do so, you should browse to the support section and select the “printer” option.
When you have found the driver, click on the download button and the software will be downloaded to your PC device. Once downloaded, install the driver to your printer. Follow the on-screen instructions to finish the setup process.
Next, install the driver update software. The software will detect outdated drivers and automatically download them to your PC. The software will also notify you when new updates are available. When the software is installed successfully, your device will run more efficiently.
And if you have any other problems, you can simply restart your computer. Then, you can check and install the Epson ET-3760 driver again. The software will automatically detect any missing or outdated drivers and fix them for you. Once you have finished installing the software, you need to make sure you have an active Internet connection.
You can get your driver from the manufacturer’s support site. After installation, you can connect your Epson ecotank et-3760 printer to your wireless network. Once the software has detected your wireless settings, you will see a screen with instructions. If you are prompted to connect to the internet, click “Yes” to continue.
To install the Epson Connect printer software, you must have your printer connected to the network. Once you have completed this, you will receive a notification. On the Windows operating system, click the corresponding icon.
From there, select the icon to install the Epson Connect printer software. Click on the icon to accept the agreement and begin the setup process. If you have an existing account, you can sign up for it from within the Epson Connect software.
Steps To Download Epson ET-3760 Driver
There are several ways to download the Epson ET-3760 driver, depending on your operating system. You can find the drivers for your printer on the manufacturer’s website, or by searching the web for the correct driver for your machine.
After locating the driver for your computer, follow the steps below to install the driver on your system. Once installed, you can use your new printer to enjoy glitch-free printing. Using the internet, go to the Epson support website to download the correct driver.
Click the appropriate file to start the installation process. If the driver has been downloaded, follow the instructions that are presented to you on the next screen. You may have to select a connection mode from the list to continue. In any case, you must choose a connectivity mode that allows you to print to a wireless network.
To install the Epson ET-3760 driver, you should go to the official website of the printer manufacturer. Navigate to the support section and find the printer option. Click on the download link and wait for the file to download to your computer. After the download is complete, you will need to install the printer driver to activate it.
After installation, restart your computer and check if the driver is now installed properly. Connect your computer to the printer. The printer should be visible on the computer’s control panel. If you do not see the device, you can proceed by exiting the printer.
Next, click on the printer icon on the computer’s desktop. Finally, make sure that you are using the same operating system as the printer. The printer must be connected to a wireless network. To download the driver, your computer must have the same operating system as the printer.
To install the Epson ET-3760 printer driver on your computer, follow these steps. To install the driver, follow the instructions on the computer’s screen.
Once you have completed these steps, the printer will be compatible with your computer. You can also choose the version of Windows that will work for your computer. If you are using Windows, the Epson ET-3760 driver is available for download on the official website.
How Do I Install Epson Scanner Software?
Step 1:
To download and install Epson scanner software Visit the Epson support site using any browser on your computer that is connected to the Epson scanner.
Step 2:
Select “Click Here.”
Step 3:
Type in the name of your product and select your scanner. Then select the scanner’s model. When you select the series number, you will see the picture of the model pop up. So, check very well if you have chosen the correct model as you can always go back to choose the right model.
Epson will automatically detect your macOS, Linux or Windows version and display it in a drop-down menu next to “Operating System.” If you mistakenly select the wrong operating system, you can always change it under the tab Download.
Step 4:
Click on Recommended For You. Then click on Download in “Recommended For You.” Here all the software and drivers needed to use the scanner are available.
If Recommended For You is not available, go to Drivers and download Epson Scan, followed by Scanner Driver. Click on Save. Before you click on Save, you can change the location you want to save the file if you want.
Step 5:
Open the downloaded file and follow the instruction shown on your screen to install the software. When the progress bar ended, you can start using your Epson device.
Epson Et-3760 Scan To Computer
Scanning images to different destinations using your Epson control panel is easy. Here is how Epson et-3760 scan to computer works:
- install the product software and connect the product to your PC or network. Be sure to restart your PC after the installation of the product software to allow scanning from the control panel.
- Place your original on the product for scanning
- Click on the Home button, if you need to
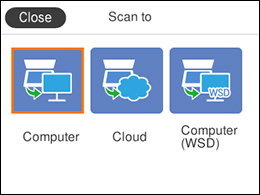
- Choose Scan and select one of the available Scan to options including Computer, cloud and Computer (WSD) as in the image below.
- Follow the next instructions
Scanning To A Connected Computer
This process allows you to scan to a connection via your product control panel. You must connect the computer via USB cable or the same network as your product. You can save your scanned files as PDF or JPEG files, or just attach them to an email.
You can even set up custom scan settings via Event Manager to automatically scan via those settings on the product control panel but it is important to install Epson Scan 2 and Event Manager on your PC before you can scan to your computer. Follow these steps:
- Place the original file on your product for scanning
- Select the Home button, if needed
- Choose Scan and a screen will appear

- Choose Computer and a screen like the below will pop up
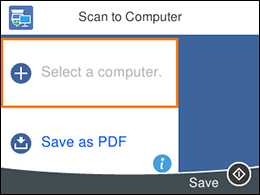
- Choose Ok to close the information screen, if needed
- Then choose Select a computer as in the above image and then follow these steps:
- If your PC is connected to your product over a network, choose the connected computer from the list displayed. (search again if your PC is not listed). If your PC is connected to your product via USB cable, just choose a USB connection.
- Click on Save as PDF and choose one of the following options:
- Save as PDF to save your scanned image as a PDF file or Save as JPEG to save your scanned image as a JPEG file or Attach to email to open the email software on your PC and save the image or scanned file as an email attachment or Follow custom setting to save the image or scanned file via custom setting you chose using Event Manager custom scan settings. It is possible to customize settings for all options via Event Manager.
- Click on Save so that the scanning can start.
Setting Up A WSD Port (Windows 7 / Windows Vista)
It is possible to scan to a networked Windows PC via Web Services for Devices (WSD). But you need to first set up the WSD port on your Windows Vista or Windows 7 (this is automatically done on Windows 8.x. and Windows 10)
Before you begin the setup process for the WSD port, be sure to install your product software and connect the product and your PC to the same network. Then follow these steps:
- Put on your product
- Print a network status sheet to identify the network model and name of your product on the network
- Select Start and choose Computer
- Select Network on the left side of your window
- Find your product on the Network screen and right-click on it. Then click on Install
- Click on Continue when the User Account Control screen appears. If an Uninstall screen pops up, click on Uninstall and repeat the process.
- When a message which says, Your device is ready to use in your Windows taskbar, click on the message.
- On your Driver Software Installation screen, check if the product is listed as Ready to use. If so, click on Close and do one of the following:
- Windows Vista: click on Start and choose the Control Panel> Hardware and Sound>Printers.
- If you use Windows 7: click on Start and choose Devices and Printers
- Be sure the icon appears for your product name on the network. Select your product name and start scanning over the network.
Using Epson Scan To Cloud
This Epson Scan to Cloud lets you scan and send your files as an upload to an online service or email directly from your Epson product. Register an email or online services like Google Drive, DropBox, Box or Evernote with your Epson Connect Account.
- Connect your Epson product to your network as explained above
- If you are yet to set up your Epson Connect account when installing your product do it at epsonconnect.com to create an account and register your product. Choose an email and password
- Choose your product and select Scan to Cloud, then select Destination List
- Choose the scanning setting to Scan to Cloud on your Epson product control panel
Epson Et-3760 Scanner Not Working
If your scanner is not working, make sure to read this guide or follow the next instruction here:
- Turn on your product and make sure the interface cables are firmly connected at all ends.
- Make sure to select Epson Scan 2 as your correct scanning program.
- Check to ensure your PC is not running in power-saving modes, such as standby or sleep. If so, wake your computer up and restart your Epson Scan 2
- Click on the connection setting to test the connection via Epson Scan 2 Utility by following these steps:
- Windows 10 Operating System: Click on Start and choose Epson>Epson Scan 2 Utility. Select your correct product or click on Other and then Reset.
- Windows 8.x Operating System: Go to the Apps screen and click on Epson Scan 2 Utility. Choose your correct product or click on Other and then Reset.
- Widows (other Windows Operating System versions): Click on Start>All Programs or Programs>Epson>Epson Scan 2>Epson Scan 2 Utility. Be sure to select the correct product. Or click on Other and the Reset.
- Mac Operating System: Open your Application folder, then click on Epson Software and then select Epson Scan 2 Utility. Choose the right product or click on Other and the Reset.
Make sure to not install multiple versions of Epson Scan 2. If you install multiple versions, install them all and re-install only one version. Also, if you have upgraded your operating system to the latest version, try reinstalling your Epson Scan 2.
Epson Et-3760 Driver For Mac
The Epson Et-3760 Driver For Mac is a printer that is compatible with Mac operating systems. It is a multifunctional printer with the capability of scanning, faxing, copying and printing. The printer also has a scanner that can scan documents and pictures in color or black and white.
Set up your product with a network connection so that you can set it up with Epson Connect.
Here is how to download the Epson Et-3760 driver for Mac:
- Download and run Epson Connect Printer Setup Utility
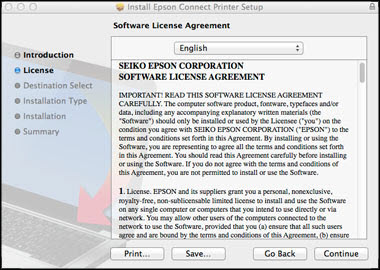
- Click on the Continue button
- Select Agree to the Software License Agreement by first clicking on Continue followed by Agree.
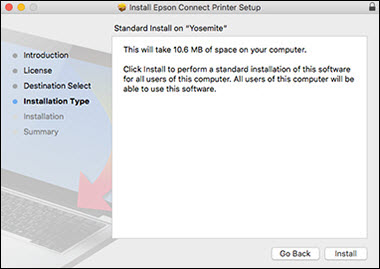
- Select Install followed by Close.
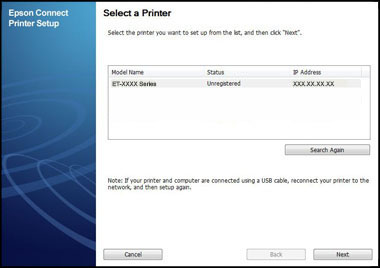
- Choose your product and click on Next. If the window does not appear automatically, open the Finder window and click on Application>Epson Software and double-click on Epson Connect Printer Setup
- Click on Printer Registration followed by Next.
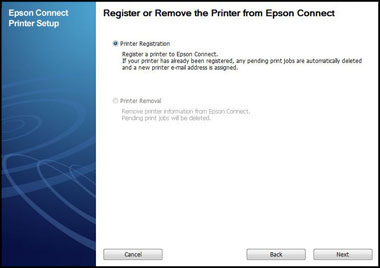
- The Register a printer to Epson Connect will show up. Click on Next.
- Scroll all the way down and click on I accept the Term and Conditions followed by Next.
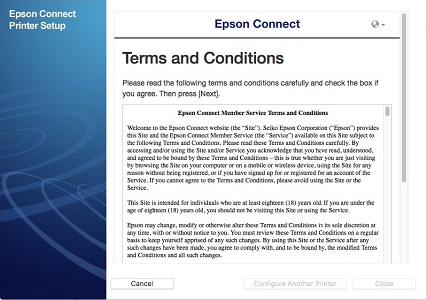
- If you are creating a new account, fill the form named Create An Epson Connect Account and click on Finish. If you want to register a new product with the account you have already created, click on I already have an account and fill the Add a new printer form followed by clicking Add.
- Click on Close
Epson Et-3760 Wireless Setup
From your product control panel, you can easily choose or change the wireless network. For Epson et-3760 wireless setup, follow these instructions below. Be sure that you install all the necessary software from the Epson website,
- Click on the Home button
- Choose Wi-Fi (recommended) or Wi-Fi Direct and click on Ok and a screen like the below will appear
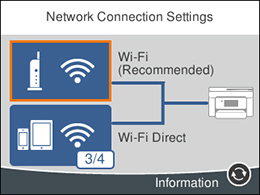
- Choose Wi-Fi (recommended)
- Click on the Start Setup or Change Settings
- Click on Wi-Fi Setup Wizard
- Click on the name of your wireless network and then click OK or press The + button followed by Enter Manually to type in the name manually. After typing it, click on OK. Remember that your network name and password are cases sensitive
- Click on OK to enter your password via the on-screen keyboard and then click on OK.
- Confirm your displayed network settings and then click on Start Setup in order to save them
- You can print the network report if you like by selecting Print Check Report or just click on Dismiss
- Click on the Home button to exit. A
 icon on the LCD screen will show up and it means you can now connect to the Wi-Fi.
 - If you cannot find icon, you must have selected the wrong network name or your network password is not correct. Repeat the steps and make sure to get it right.
Epson Et-3760 Manual (Epson Event Manager Software Et 3760)
The Epson ET-3760 is a color inkjet printer that prints high-quality, borderless photos.
This printer is a great choice for those who are looking for a high-quality photo printer. It has the excellent print quality and can print borderless photos in just one second. The Epson ET-3760 also has Wi-Fi connectivity, which means you can print from your mobile device without any additional equipment.
You can download the Epson et-3760 manual here.
Epson Et-3760 Not Printing Color (Epson Event Manager Software Et 3760)
The Epson ET-3760 printer is a color inkjet printer that is designed for home and office use. The ET-3760 prints at high speeds and the colors are vibrant. If your printout is having incorrect colors, or your Epson et-3760 is not printing color, here is what you should do:
- Check to see that your paper type setting matches the type of paper you loaded
- Check to ensure the Greyscale is not selected in the printer software
- If you have chosen Normal-Vivid (Mac) or Standard-Vivid (Windows) as your quality setting in your printer software, try changing it to Normal (Mac) or Standard (Windows)
- Check the nozzle to see if the print head nozzles are clogged. If that is the problem, clean the print head
- Check the ink level to ensure it is not low. If it is low, refill it.
- In case you have printed when the level of the ink is too low to be seen in the ink tank windows, you should refill the ink to the upper lines and then run the Power Cleaning Utility. Check if the print quality has improved.
- Note that after printing, the colors in the print have to settle and dry. While it is drying, the colors may not look like your real color. To allow the printouts to dry quickly, do not stack them
- The thing is that the screen color cannot be completely the same as your printouts. However, you can use color management to get the best color there is
- Always use genuine Epson paper to get the best results
- If it is been a long time since you have used your printer, run the Power Cleaning Utility. Note, that Power Cleaning Utility consumes lots of ink, so only run it after trying all the solutions and you still cannot get improved print quality.
Epson Et-3760 Photo Printing (Epson Event Manager Software Et 3760)
The Epson ET-3760 prints high-quality photos with a well-defined color. Watch The video below to see how well Epson et-3760 photo printing works.
Epson ET-3760 Setup (Epson Event Manager Software Et 3760)
For Epson ET-3760 setup, watch the video below.
How To Fix Epson ET 3760 Printer Error (Epson Event Manager Software Et 3760)
Epson ET 3760 printer error can occur due to different reasons including
- Outdated driver
- Offline status in the printer
- Printer not set as default printer
- Paper jammed problem
- Spooler service problem
- Poor or improper network connection
To fix the Epson ET 3760 printer error, follow these steps:
Step 1: Disable The Offline Printer Feature
To solve this issue:
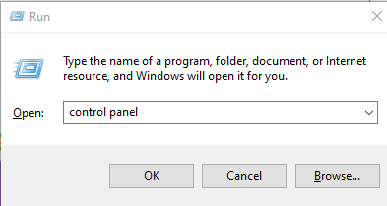
- Open the Run Dialog or type Run in the Windows search bar and click Enter. Type control panel in the space provided and click on OK.
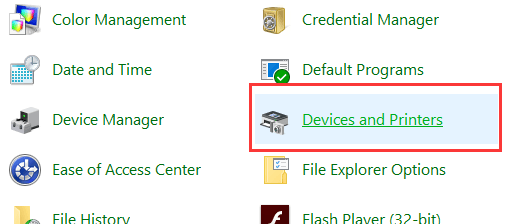
- Select Device and Printers
- From the list of the printer, right-click and select See What’s Printing.
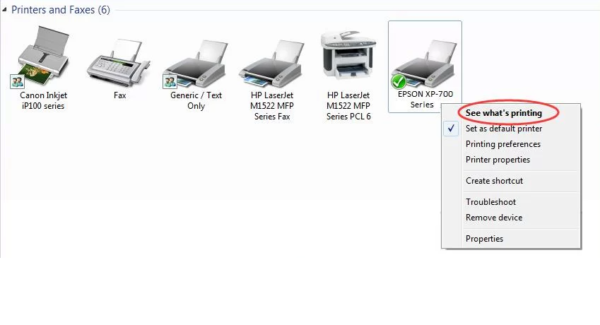
- Click on the Printer to see if there is a tick on Use Printer Offline. Uncheck it
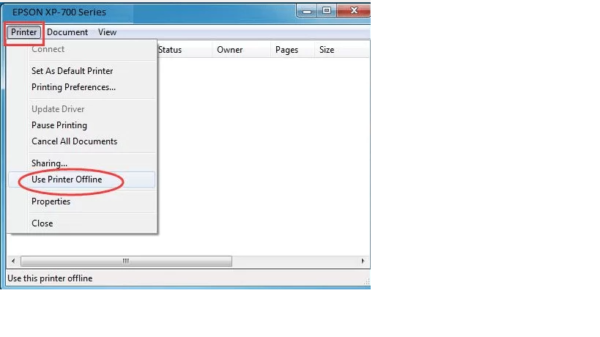
- Close the window and then restart the printer.
That error should be fixed by now and you should be able to use your printer again.
Step 2: Set The Printer As Your Default Printer
If your printer is not set as the default printer, follow these steps to set it as the default printer.
- As explained above, follow the same process and now, click Device and Printer
- Right-click your desired printer and choose Set as default printer.

Epson Event Manager Software Features
The Epson Event Manager software is a utility provided by Epson that enhances the functionality of your Epson scanner or all-in-one printer. It offers various features to streamline scanning and make it more efficient. Here are some of the key features of Epson Event Manager Software:
- Customizable Scan Settings: Epson Event Manager allows you to create and save custom scan settings, including resolution, scan area, file format, and more. This feature is particularly useful for repetitive scanning tasks, as it eliminates the need to reconfigure settings each time.
- One-Touch Scanning: You can set up one-touch scanning buttons on your scanner or printer. These buttons can be configured to perform specific scan tasks with a single click. For example, you can set a button to scan a document to a PDF file or to send a scanned image via email.
- Automatic File Naming: The software can automatically assign names to scanned files using predefined templates. This can save time and ensure consistent file naming for your scans.
- Scan-to-Email: Epson Event Manager enables you to scan a document or image and send it directly to your email client as an attachment. You can configure the email settings to specify recipients, subject lines, and other details.
- Scan-to-PDF: You can easily scan a document or series of pages and save them as a PDF file. The software allows you to customize PDF settings, such as compression and password protection.
- Scan-to-Cloud: This feature allows you to scan documents and upload them directly to cloud storage services like Dropbox, Google Drive, or Microsoft OneDrive. It streamlines the process of archiving and sharing documents.
- OCR (Optical Character Recognition): Epson Event Manager can perform OCR on scanned documents, converting them into editable text. This is particularly helpful for digitizing text-heavy documents.
- Auto-Crop and Auto-Deskew: The software can automatically detect and correct skew and crop scanned images to remove excess borders, enhancing the quality of your scans.
- Advanced Preview Options: It provides features like thumbnail previews and the ability to preview and select specific areas of a document for scanning, reducing the chance of errors.
- Compatibility with Third-Party Software: Epson Event Manager may also integrate with third-party software or applications, allowing for seamless interaction with your preferred image editing, document management, or other software.
- Scheduled Scanning: You can set up scheduled scans, enabling the software to automatically perform scanning tasks at specific times or intervals.
- Event-Based Actions: The software can trigger actions based on specific events. For example, it can launch an application or send an email notification when a scanning task is completed.
Printer Setup and Configuration for Epson Event Manager Software Et 3760
Setting up and configuring the Epson ET-3760 printer with the Epson Event Manager software involves several steps. Here’s a step-by-step guide to help you through the process:
Step 1: Unpack the Printer
Remove the printer from its packaging and ensure all included components are present, such as ink bottles, power cord, and documentation.
Step 2: Install Ink
- Lift the scanner unit and open the ink tank cover.
- Unpack the provided ink bottles and carefully remove the caps.
- Insert the ink bottles into their corresponding tanks (Cyan, Magenta, Yellow, and Black).
- Slowly squeeze the ink into the tanks until they are full.
- Close the ink tank cover and the scanner unit.
Step 3: Power On the Printer
- Plug the power cord into the printer and a power outlet.
- Press the power button to turn on the printer.
Step 4: Language and Date/Time Settings
Follow the on-screen instructions to select your language and set the date and time.
Step 5: Load Paper
- Pull out the paper cassette.
- Adjust the paper guides to fit your paper size.
- Load plain paper and push the cassette back in.
Step 6: Connect the Printer to Wi-Fi
- Press the home button on the printer’s control panel.
- Select “Wi-Fi Setup” and follow the on-screen instructions to connect the printer to your Wi-Fi network.
Step 7: Install Epson Event Manager Software
- Visit the Epson website and navigate to the support section for the ET-3760 printer.
- Download the Epson Event Manager software for your operating system (Windows or macOS).
- Run the installer and follow the on-screen instructions to complete the installation.
Step 8: Configure Epson Event Manager Software
- Launch the Epson Event Manager software.
- Configure the software to work with your specific needs, such as setting up shortcuts for specific scan actions.
- Test the software to ensure it communicates with your printer.
Step 9: Test a Print and Scan
- Print a test page to ensure the printer is functioning correctly.
- Perform a test scan to ensure the Event Manager software is working as expected.
Step 10: Driver and Software Updates
Check for driver and software updates on the Epson website and install any available updates to ensure optimal performance.
Compatible Operating Systems and Devices
The compatibility of the Epson ET-3760 printer with various operating systems and devices is crucial for users who want to ensure a smooth printing and scanning experience.
The Epson ET-3760 was compatible with the following operating systems and devices:
Compatible Operating Systems
- Windows: This includes various versions of Windows, such as Windows 10, 8.1, 8, 7, and in some cases, older versions like Windows Vista and Windows XP.
- macOS: Epson provides drivers and software for Mac users. The specific versions of macOS may vary but support typically extends to macOS 10.14 and later.
Compatible Devices
- Desktop Computers: The Epson ET-3760 is compatible with desktop computers running the supported Windows and macOS operating systems.
- Laptops: Laptops running compatible versions of Windows or macOS can connect to the Epson ET-3760 via a USB cable or Wi-Fi, depending on the preferred connection method.
- Smartphones and Tablets (iOS/Android): Epson often provides mobile printing and scanning solutions. Users with iOS and Android devices can download and install the Epson iPrint app or other Epson mobile apps to print and scan wirelessly.
- Chromebooks: Some Epson printers are compatible with Chromebooks. Check with Epson for specific details and compatible models.
- Networked Devices: The Epson ET-3760 can be connected to a local network, making it accessible to any device on the same network. This allows various devices, including smartphones, tablets, and laptops, to print or scan through Wi-Fi.
- Cloud Printing: Epson printers may support cloud printing services such as Google Cloud Print, which enables printing from any device with internet access.
- Email Printing: Some Epson printers offer email printing, allowing users to send print jobs by emailing the printer directly.
Printing Tips and Tricks
Printing tips and tricks can help you get the best results from your printer, whether you’re using an inkjet, laser, or any other type of printer. Here are some valuable printing tips and tricks to improve your print quality and efficiency:
1. Use High-Quality Paper
Choose the appropriate paper type for your printing needs. High-quality paper can significantly impact the final output.
2. Adjust Print Settings
Experiment with print settings like resolution, paper type, and color settings to find the best combination for your specific print job.
3. Update Printer Drivers
Ensure you have the latest printer drivers installed for your device. Visit the manufacturer’s website for updates.
4. Calibrate Your Printer
Calibrating your printer helps ensure accurate color reproduction. Use printer calibration tools or follow your printer’s manual for guidance.
5. Print in Draft Mode
When high-quality prints aren’t necessary, use the draft mode to save ink or toner. This is suitable for drafts and documents for personal use.
6. Print in Grayscale
If you don’t need color, printing in grayscale can save color ink and produce faster prints.
7. Save Ink or Toner
Use “Eco” or “Toner Save” mode to reduce ink or toner consumption. This is great for printing drafts or documents that don’t require high quality.
8. Clean Your Printhead
Regularly clean your printer’s printhead to prevent ink clogs and ensure consistent print quality.
9. Align Your Printer
Periodically align your printer’s printhead and cartridges to maintain print accuracy.
10. Use High-Resolution Images
When printing images, make sure you’re using high-resolution files to avoid pixelation.
11. Choose the Right Font
Fonts can impact ink consumption. Opt for more eco-friendly fonts when possible.
12. Proofread Before Printing
Review your documents on the screen before printing to avoid unnecessary reprints.
13. Print Multiple Pages on One Sheet
Use the “N-up” printing feature to print multiple pages on a single sheet of paper. This is ideal for handouts and saving paper.
14. Print in Booklet Mode
Use booklet mode for creating folded booklets, brochures, or pamphlets directly from your printer.
15. Use a Print Preview
Take advantage of print preview options to check your document’s layout and ensure it’s formatted as desired before printing.
16. Duplex (Double-Sided) Printing
If your printer supports it, enable duplex printing to save paper.
17. Adjust Margins
Adjust your document’s margins to fit more content on a page or to make it more aesthetically pleasing.
18. Consider PDF Printing
When sharing documents, consider saving them as PDFs and distributing them digitally to reduce paper usage.
19. Store Paper Properly
Store your paper in a cool, dry place to prevent it from becoming too humid or too dry, which can affect print quality.
20. Regular Maintenance
Follow your printer’s maintenance schedule to keep it in good working condition.
FAQs
How Do I Scan With Epson 3760 From A Smart Device?
How Do I Install Epson Event Manager?
To install Epson Event Manager, select the Add Program button, choose Event Manager from the list of programs and click on OK. Then confirm by checking the box for Event Manager from the Programs and Services list and click Ok. Launch Event Manager and select your Epson products and scanners.
Does Epson 3760 Have An ADF?
No. While Epson ET-3760 is a bulk-ink-all-in-one printer, the only issue for businesses with it is that it lacks an ADF. This is a real deal-breaker for some offices.
Do You Need Epson Event Manager?
Epson Event Manager is important if you are ready to take advantage of all the features offered by your Epson product.
How Do I Open Epson Event Manager?
To open your Epson Event Manager, try one of the following:
- For Mac OS X: Select\Application\Epson software and then double-click on the Launch Event Manager icon
- Windows: Click on the Start button or Start>Programs or All Programs>Epson Software>Event Manager
Is The Epson ET-3760 Discontinued?
No, the Epson ET-3760 is not discontinued.
Does The Epson 3760 Have A Document Feeder?
Yes, Epson 3760 has an automatic document feeder to process photos and documents. The Epson ET-3760 is an excellent printer with amazing scanning features and it is perfect for offices and families.
Is Epson 3760 Good For Sublimation?
Yes. The ET-3760 offers great quality and amazing consistency with every print. The good thing is that it is easy to maintain and use for an extended time. With its high-quality 4800 x 1200 dpi, your print consistency will be next to nothing.
Conclusion On Epson Event Manager Software Et 3760
If you are ready to enjoy all the features of your Epson product, then you must install Epson Event Manager Software Et 3760. This software is amazing and it is what you need to make all your Epson product features function to their maximum capacity.
Installing Epson Event Manager Software Et 3760 is easy, just follow the steps discussed in this article and you can install it easily without any hassles. So, enjoy your Epson Event Manager Software Et 3760.

15 Best Language Learning Software Reddit – Very Easy To Use
Acuity Scheduling Review – Is It The Best Scheduling Software?

Basecamp Review – Easy-to-Use System to Organize Your Business Better
About Author
admin
Nathaniel is a tech enthusiast and a passionate blogger. He writes tech blogs and reviews products. He is also a teacher who loves designing stuff on PowerPoint, Photoshop and creating videos and product images on Blender software