How To Use Lightburn Software Without Hassle
Looking for how to use Lightburn software? Lightburn Software is a cutting-edge solution for anyone looking to take their laser cutting and engraving projects to the next level.
With its powerful features and user-friendly interface, Lightburn makes it easy for anyone, from hobbyists to professionals, to easily create precise and intricate designs. Whether you’re working on a one-of-a-kind piece of art or a batch of custom engraving or laser cutting, Lightburn is the perfect tool for the job.
However, everything has a learning phase. This blog will dive into the world of Lightburn software and show you everything you need to know to get started. From setting up your laser cutter to mastering the software’s many features, I have got you covered.
Step-By-Step Guide On How To Use Lightburn Software
Using Lightburn software is not difficult. Here is how you can start using Lightburn software now:
Lightburn Software Download
To use Lightburn software, you need to download it. The software comes in a 30-day free trial, so you can test the software for a whole month. When you land on the download page, you will find the download for Windows (32-bit and 64-bit), Mac OSX and Linux 64-bit.
Before you download Lightburn, check Lightburn’s minimum requirements. After downloading, installing it is simple. Go to the folder you downloaded it to and launch the installer. Installing it is easy as you only need to follow prompts. You can follow the installation process here based on your system.
How To Set Up Laser With Lightburn
After downloading and installing the software, you need to set up your laser with Lightburn. The setup will tell Lightburn the kind of laser you have. If you are just installing Lightburn, you will be redirected to the page where you will configure your laser.
You have to pick something as the Lightburn interface will change based on the capability of the laser you select. If you are not ready to connect a laser, you can just add a placeholder device to store your settings and the options to show on the interface of Lightburn.
To add a placeholder for laser manually. If you have a certain laser in mind, check the right setting for it and see if there is support for it.
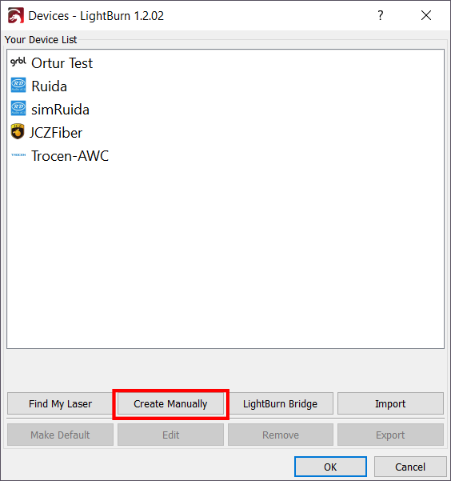
Lightburn will open a New Device Wizard and see a list of the controllers support for your Lightburn version as shown below.
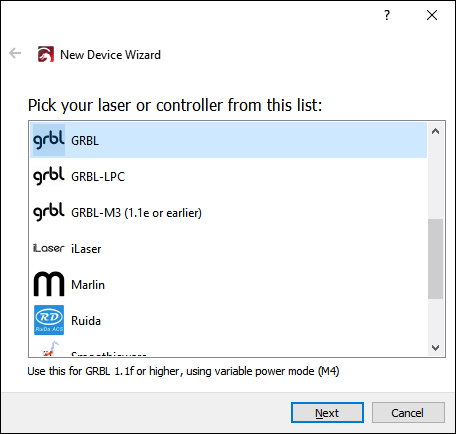
Select the entry that matches your laser’s firmware or controller and then click on Next. Choose how to connect to your laser. This connection choice depends on the connection methods your Lightburn and controller supports. The most common connection is Serial/USB.
Some controllers support Ethernet connection including wired and Wi-Fi. Check the image below.
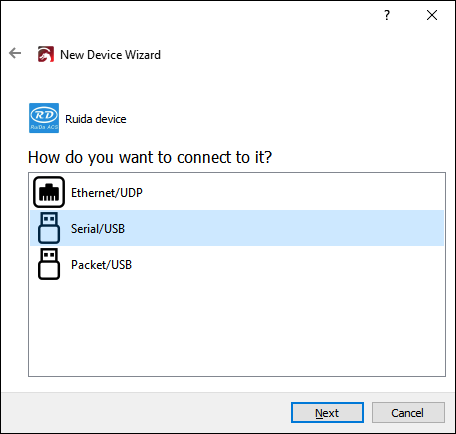
After choosing the right connection, click on Next. The next thing is to name the work area. If you have more than one laser, you should name your laser to make the selection easier for you when you want to use them. You may also leave it as it is without naming it. Click on Next.
Setting the size of your work area is the next thing to do. This will prevent Lightburn from working out of its bound. If you do not want to set the size now, you can do it in Device Settings (https://docs.lightburnsoftware.com/UI/DeviceSettings.html) later.
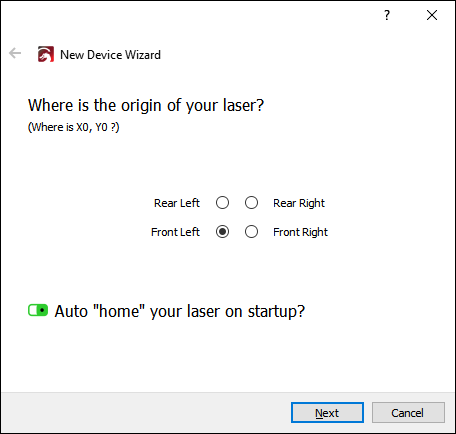
Also, you should set the homing and origin of the laser. This is where the ‘zero’ point of the X&Y axis meets. This setting can be changed anytime in Device Setting. It controls the orientation of the output. See the image below.

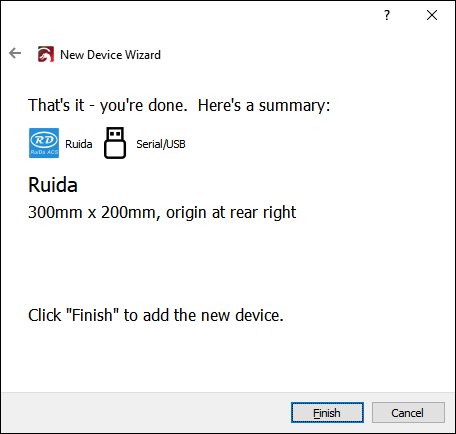
That is it. After clicking on Next, it will bring up the final page. You can go back to fix any mistakes or simply click on Finish as shown below.
How To Connect To Laser?
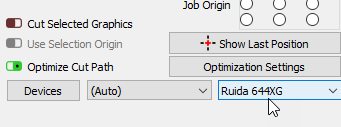
Once you are done with the laser addition to your Lightburn software, it will appear in the list of devices to the right of the Devices button in your laser window. Your laser will be chosen automatically if you have added only one but if you have more than one, it will ask you to choose. See the below image.
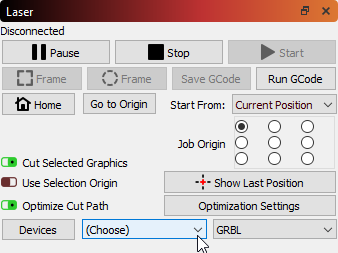
Depending on your controller, you may have to select the port your laser will connect to by clicking Choose in the Laser Window as shown below.
Once you select your laser port, it will connect to the same port automatically next time except if you are using another type of port or it fails to detect your selected port. If your laser disconnects for any reason, go to Devices to reconnect it.
After connecting your laser. You can start working on your Lightburn. Here is a step-by-step guide on how to use Lightburn software would include the following steps:
Step 1: Install Lightburn
The first step is to download and install Lightburn on your computer.
Step 2: Connect your laser cutter
Connect your laser cutter to your computer using the USB cable provided with your machine.
Step 3: Load the software
Open Lightburn and select the “Connect” option to connect to your laser cutter.
Step 4: Import your design
Use the “Import” feature to bring your design into Lightburn. You can import various file types, including JPG, PNG, SVG, and others.
Step 5: Edit your design
Use the editing tools in Lightburn to modify your design as needed. You can add text, shapes, images, and more to your design.
Step 6: Set laser cutter settings
Go to the “Settings” menu in Lightburn to set the laser cutter settings for your project, including power, speed, and resolution.
Step 7: Preview the cut:
Use the “Preview” feature to see how your design will look when cut. Make any necessary adjustments to your design or settings.
Step 8: Start the cut
When you are ready, select the “Cut” option to start the laser cutting process.
Step 9: Monitor the cut
Lightburn provides real-time updates on the progress of your cut, so you can monitor it as it happens.
These are the basic steps for using Lightburn software. As you gain experience with the software, you can explore its advanced features and tools to achieve even better results.
What Are The Benefits Of Using Lightburn Software
Lightburn software is a great way to improve your laser cutting and engraving productivity. It has many features that can help you get more work done in less time. Some of the benefits of using Lightburn software include: –
Intuitive Interface: Lightburn has a user-friendly interface that makes it easy for users to get started and quickly become productive.
- Advanced Features: Lightburn offers advanced features such as multi-layer cutting, automatic nesting, and adjustable power output, which allow users to achieve professional-level results.
- Compatibility: Lightburn supports a wide range of laser cutters and engravers, making it a versatile tool for users with different types of equipment.
- Time-saving: Lightburn automatic nesting and power control features help users save time and optimize their workflow.
- Precision: Lightburn allows for precise control over laser cutting and engraving, enabling users to achieve precise results with minimal waste.
- Support: Lightburn offers a large community of users, as well as a dedicated support team, to help users get the most out of the software.
- Affordability: Lightburn offers a cost-effective solution for laser cutting and engraving compared to other professional software options.
- Increased productivity: With its user-friendly interface, advanced features such as multi-layer cutting and automatic nesting, and precise control over laser cutting and engraving, Lightburn helps users work more efficiently and effectively.
The software’s ability to optimize the workflow and save time can lead to increased productivity, enabling users to get more done in less time and with greater accuracy.
- More accurate work: The software provides you with precise control over laser cutting and engraving, enabling them to achieve precise results with minimal waste.
Lightburn’s advanced features, such as adjustable power output and multi-layer cutting, also help users achieve more accurate results.
Additionally, Lightburn’s compatibility with a wide range of laser cutters and engravers helps users get the most out of their equipment, further improving the accuracy of their work.
- The ability to work on larger projects: The Lightburn’s advanced features, such as multi-layer cutting and automatic nesting, make it well-suited for working on larger projects.
Additionally, Lightburn’s compatibility with a wide range of laser cutters and engravers enables you to work with larger and more complex designs, further increasing the software’s ability to handle larger projects.
With Lightburn, you have the flexibility and versatility to tackle even the most demanding projects with confidence.
What Are The Lightburn Tips And Tricks
It is important to be at ease with Lightburn software. So, these tips and tricks are important to help you use the software effortlessly. Here are some Lightburn tips and tricks to use Lightburn software effectively and easily:
Familiarize Yourself With The Software
Take the time to explore Lightburn’s features and tools to get a feel for what it can do. Watch tutorials and read the manual to learn the ins and outs of the software.
Connect Your Laser Cutter
Make sure your laser cutter is properly connected to your computer to ensure smooth and accurate cuts.
Import Your Designs Carefully
Take care when importing your designs into Lightburn to ensure that they are properly aligned and scaled.
Use The Preview Feature
Use the Preview feature to see how your design will look when cut and make any necessary adjustments before starting the cut.
Experiment With Laser Settings
Try different laser settings to see how they affect the final result and find the ones that work best for your particular project.
Optimize Your Designs
Take advantage of Lightburn’s advanced features, such as automatic nesting and multi-layer cutting, to optimize your designs and minimize waste.
Make Use Of The Community
Lightburn has a large and active community (https://forum.lightburnsoftware.com/) of users who can help you with any questions or issues you may have. Take advantage of this resource and connect with other users.
Keep Learning
Stay up-to-date with the latest features and updates by regularly visiting the Lightburn website and checking for new tutorials and guides.
By following these tips and tricks, you’ll be well on your way to using Lightburn software effectively and easily. With its powerful features and user-friendly interface, Lightburn is a great choice for laser cutting and engraving projects.
How To Troubleshoot Lightburn Software Common Problems
When using Lightburn software, you may experience a few issues, but not common. Here are some issues you may encounter when using Lightburn software:
1. Troubleshooting Connection Problems
If you are having difficulty connecting to your laser, here is what you should do:
- Install the latest driver for your laser. A Chinese diode laser uses https://sparks.gogo.co.nz/ch340.html while you can the driver for TopWisdom and Ruida controllers can be found at the end of the Lightburn installer.
- You may have to install LaserCAD if you use the Trocen controller.
- Check to see if you are physically connected to your laser and ensure you select the right laser. Also, make sure to choose the right connection and controller in Lightburn.
- Your system may not connect automatically, try to connect it manually as explained above if it fails to connect automatically.
- Poor USB cable quality can cause connection issues. You can try a different laser cable.
- Ensure your USB cable length is not longer than 16 feet. If it is, you may need an amplifier or active extension to make the signal strong enough.
- Check if all the metal parts are grounded and bonded correctly. If your laser is not correctly bonded, the head or rails of the laser can build up static which will discharge through the USB connection to the PC and cause some errors.
- If you use appliances that consume a lot of power, they can cause a power drop that can cause your laser to temporarily disconnect or brown out.
- If your USB port is sleeping because of idleness, the connection may be lost. This is common when you are using a laptop. You can follow these links to set your laptop to prevent sleeping mode while working.
Windows 7: https://pattersonsupport.custhelp.com/app/answers/detail/a_id/14917/~/disable-power-management-on-windows-7-machines 54.
Windows 10: https://www.windowscentral.com/how-prevent-windows-10-turning-usb-devices 202
If you experience a connection to the wrong port problem because you have multiple devices connected to your computer, you should force Lightburn to ignore the ports you are not using by creating a file called PortExclude.txt
To create the file, go to File>> Open Prefs Folder and then create PortExclude.txt. List all the ports you want to exclude in the file as they show in the port drop-down selection. Make sure each port is on a line. Save the file and the problem should be solved.
2. Troubleshooting GBRL Problems
GBRL can bring up some issues but here is how to solve them:
- Busy error: If you get this error in Lightburn while your machine has not moved an inch, check to see if you are connected to the controller. Check and select a communication port. If you cannot select a port, check if you have installed the driver for your machine.
- Machine busy or paused error: If this error pops up, you have not connected to the machine. Install the right driver for your machine and choose the right communication port to connect to.
- Alarm:2 error: If you have your working area set, this error will pop up when you send the machine outside the working area. You may reset your working area to accommodate the work you are doing.
- Error:5: This error usually occurs if Lightburn sends a command to the controller to home but you have not configured or enabled homing in the controller. If you turn on Auto-home in the device setting without homing switches, this error can pop up.
3. Troubleshooting Ruida Errors
If you use Ruida controllers, here are the common errors you can encounter:
- Frame slop over: Check your design. It may be crossing one or more of your machine’s sides. While you can continue your work even with this error, the part of the design that is outside the boundary will not be drawn.
- Not enough extend space: This error means your design is too close to the side of the machine for the speed the machine is running at. That means the machine has no sufficient space off the design side to slow down or speed up. You have to move your design inward far from the sides or go slower.
- Machine protected: It means you have enabled door sensor protection but the controller is not detecting that the door switch is closed. Usually, it means your machine lid is not closed or the wiring or door switch is faulty.
- Water protected: Water protection is enabled but your controller is not detecting signals from the water protection sensor. It means the water is not flowing through the tube or the wiring is incorrect or the sensor is defective.
- The machine is busy or paused: Lack of communication between Lightburn and the controller can be the cause of this error. Lightburn usually shows this error when the laser is busy and not taking commands or lose communication with the laser. Reset the connection by right-clicking the Device button.
How To Use Lightburn With Atomstack
LightBurn and Atomstack are two popular software tools used for laser cutting and engraving. Here are the steps you can follow to use LightBurn with Atomstack:
- Install LightBurn software on your computer.
- Connect your Atomstack laser cutter or engraver to your computer via USB.
- Start LightBurn and go to the “Setting” menu, select “choose” and choose “Atomstack” from the list of available devices.
- Follow the on-screen instructions to complete the setup process, making sure that the correct port and baud rate are selected.
- Once the setup process is complete, you will be able to control your Atomstack device from within LightBurn.
- Use the LightBurn software to create and edit your designs, adjusting the laser settings as needed.
- When you are ready to cut or engrave, simply import or create your design in LightBurn to begin the process.
By following these steps, you can easily use LightBurn with Atomstack to create beautiful and precise designs. If you encounter any issues during the setup process, consult the LightBurn user manual or their support team for help.
How To Use Lightburn With Xtool D1
LightBurn and xTool D1 are both widely used software tools for laser cutting and engraving. Watch the above video. Here is a step-by-step guide to using LightBurn with xTool D1:
- Install LightBurn software on your computer. Also, install the driver for Xtool D1
- Connect your xTool D1 laser cutter or engraver to your computer via USB.
- Start LightBurn and go to the “Setting” menu, select “Choose and choose “xTool D1” from the list of available devices.
- Follow the on-screen instructions to complete the setup process, making sure that the correct port and baud rate are selected.
- Once the setup process is complete, you will be able to control your xTool D1 device from within LightBurn.
- Use the LightBurn software to create and edit your designs, adjusting the laser settings as needed.
- When you are ready to cut or engrave, simply click the “Start” button in LightBurn to begin the process.
By following these steps, you can easily use LightBurn with xTool D1 to create intricate and detailed designs. If you encounter any issues during the setup process, consult the LightBurn user manual or reach out to their support team for assistance.
The Bottom Line
Lightburn is a powerful and versatile software that offers a wide range of features for laser cutting and engraving. By following the steps outlined in this article (how to use Lightburn software), you will be able to get quickly and easily started using Lightburn to create intricate designs and bring your ideas to life.
Whether you are a seasoned professional or a beginner, Lightburn is an excellent choice for anyone looking to take their laser cutting and engraving to the next level. So go ahead, give Lightburn a try and unleash your creativity!
Resources: https://lightburnsoftware.com/pages/lightburn-documentation
Software 2020 – The Best Free Software Of 2020

How To Submit A Website To Search Engines For Indexing Within 24 Hours

How To Uninstall Software On Mac Without Any Leftover?
About Author
admin
Nathaniel is a tech enthusiast and a passionate blogger. He writes tech blogs and reviews products. He is also a teacher who loves designing stuff on PowerPoint, Photoshop and creating videos and product images on Blender software