How To Use LaserGRBL
If you’re here wondering how to use LaserGRBL, let me start by saying, welcome to the club of modern-day Michelangelos, except we don’t chip away at marble – we zap things with lasers!
Whether you’re a hobbyist or a curious newcomer, LaserGRBL is your ticket to turning your creative ideas into reality. And, unlike that fancy LightBurn software, it won’t ask for your wallet at the door.
How to Use LaserGRBL
How to use LaserGRBL? LaserGRBL is a laser engraving software free designed specifically for GRBL-based laser engravers. To start using LaserGRBL effectively, you need to understand its core functionality and setup. Here’s a step-by-step guide to how to use LaserGRBL:
1. Download and Install LaserGRBL
Visit the official LaserGRBL website and download the latest version of the software. The installation process is straightforward – just follow the prompts. Make sure your system runs Windows, as LaserGRBL is not compatible with Mac or Linux except you want to employ some tech tricks to do that.
2. Connect Your Laser Engraver
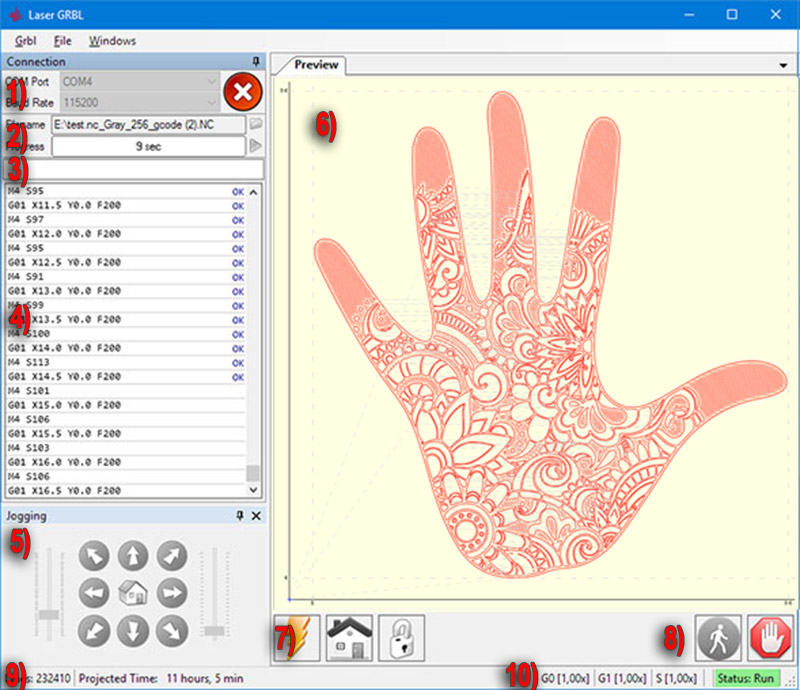
Plug in your laser engraver to your computer via USB. Open LaserGRBL and navigate to the connection panel at the top left. Select the correct COM port and set the baud rate to match your device’s settings (usually 115200). Hit “Connect,” and your machine should sync.
3. Load Your Design
LaserGRBL supports various file formats like BMP, JPG, PNG, and SVG. Simply click “Open File” and select your design. The software will convert the image into G-code, which your engraver uses to understand the design.
4. Adjust Laser Settings
Set your engraving parameters, such as speed, power, and resolution. These settings vary depending on the material (wood, acrylic, leather, etc.) and desired outcome. Always perform a test run on scrap material.
5. Start Engraving
Once satisfied with your settings, press “Run” to start engraving. Monitor the process closely for safety and quality control.
Don’t forget safety! Always wear protective eyewear and keep flammable items far away. That’s right – you don’t want to recreate a campfire in your workspace.
LaserGRBL Settings: The Secret Sauce
Getting the settings right in LaserGRBL is like adjusting the spice levels in your favorite dish. Too little, and it’s bland; too much, and you might just ruin it. Let’s break it down:
- Speed: This controls how fast the laser moves. Lower speeds are great for deep engraving but can lead to scorching. Faster speeds are better for lighter marks.
- Power: Think of this as the laser’s intensity. For softer materials like wood or leather, you’ll want lower power settings. Harder materials, like acrylic, might need more juice.
- Resolution: This determines the level of detail. Higher resolutions mean more time and precision but can make simple designs overly complicated.
- Passes: Sometimes, one pass isn’t enough. Multiple passes can help achieve deeper cuts without overburdening your laser.
Pro tip: Always test on a scrap piece before engraving into your final material. You’ll thank yourself later when your masterpiece doesn’t end up looking like an abstract art project gone wrong.
LaserGRBL for Mac: A Tale of Workarounds
Here’s the catch: LaserGRBL doesn’t natively support Mac. Yes, I know, it’s like being handed a delicious slice of cake only to realize you don’t have a fork. But don’t worry, where there’s a will, there’s a way:
1. Boot Camp
Install Windows on your Mac using Boot Camp. This creates a dual-boot system, letting you run LaserGRBL in a Windows environment. Sure, it’s a bit of a hassle, but it’s a solid solution.
2. Virtual Machines
Use software like Parallels or VirtualBox to create a virtual Windows machine on your Mac. This method is less disruptive but may require a decent amount of RAM to run smoothly.
3. Wine
This compatibility layer allows you to run some Windows programs on macOS. It’s hit-or-miss with LaserGRBL, but worth a try if you’re adventurous.
While these workarounds might not be ideal, they’re effective. Alternatively, you can explore other software options compatible with Mac. For example, check out how to use LightBurn software to see if it fits your needs.
LaserGRBL Software: A Closer Look
Let’s talk about why LaserGRBL is a fan favorite. This laser engraver software free comes packed with features that make it a go-to choice for hobbyists and budget-conscious creators:
- User-Friendly Interface: You don’t need a PhD in engineering to figure this out. The layout is straightforward, and the tools are intuitive.
- Lightweight: Unlike some bloated software, LaserGRBL runs smoothly even on older computers.
- Customizability: You can tweak settings to suit various materials and designs, making it versatile.
- Regular Updates: The developers keep improving the software, adding features and fixing bugs.
The best part? It’s free! You’re not signing up for any hidden fees or surprise charges. But if you’re looking for advanced features, check out the LightBurn software review to see how it stacks up against LaserGRBL.
LaserGRBL vs LightBurn: Which One Wins?
When comparing LaserGRBL vs LightBurn, the choice often boils down to budget and features:
- LaserGRBL: Free, lightweight, and perfect for beginners. It’s great if you’re looking for a laser engraving software free of cost.
- LightBurn: Paid, feature-packed, and highly customizable. For professionals, LightBurn’s extensive tools may be worth the investment. You can read more in the article about how much LightBurn software cost.
If you’re dabbling in laser engraving as a hobby, LaserGRBL will serve you well. For advanced users who need intricate features like node editing and layered designs, LightBurn might be your go-to.
Free Laser Engraving Software: Is It Worth It?
If “free” makes you think of clunky, outdated software, think again. LaserGRBL is an excellent free software for laser engraving, offering robust features that rival some paid options. Here’s what makes it worth your time:
- Ease of Use: Simple interface and easy navigation.
- Compatibility: Works with most GRBL-controlled laser engravers.
- Cost-Effective: No subscription or hidden fees.
However, if you want to dive into premium features, check out how to use LightBurn software for a broader understanding of paid options.
Troubleshooting LaserGRBL Issues
What happens if LaserGRBL refuses to play nice? Here are common issues and how to solve them:
1. Device Not Connecting
- Check your USB cable and ports. Update your drivers if needed.
- Restart the software and try again.
2. Burn Marks Too Dark or Light
Adjust the power and speed settings. Lower power is for lighter burns, and higher power is for darker ones.
3. Image Misalignment
Use the preview function to verify positioning. Secure your material to prevent movement during engraving.
4. Software Freezing
Ensure your computer meets the software requirements. If it’s underpowered, try closing unnecessary applications while running LaserGRBL.
Advanced Tips for Laser Engraving
Once you’ve mastered the basics, it’s time to level up:
1. Material-Specific Settings
- For wood: Medium speed and high power.
- For acrylic: High speed and low power.
- Experiment to find the sweet spot for each material.
2. Layered Designs
Create complex engravings by layering multiple designs. Start with the outline, then add shading or details.
3. Vector Files
Use vector files (SVG or DXF) for crisp, scalable designs. Free tools like Inkscape can help convert raster images to vector.
Free Software for Laser Engraving vs Paid Options
While free software for laser engraving like LaserGRBL is a great starting point, let’s not ignore the pros of paid alternatives:
- LaserGRBL: Simplicity and cost-saving.
- LightBurn: Advanced design tools, better customer support, and frequent updates.
Before deciding, ensure your computer meets the LightBurn software requirement to avoid performance issues.
Recommended Materials for Laser Engraving
LaserGRBL works beautifully on:
- Wood: Great for creating coasters, plaques, and signs.
- Acrylic: Perfect for decorative pieces and signage.
- Leather: Ideal for wallets and custom tags.
Avoid reflective materials unless you have a laser engraver designed for them.
The Bottom Line on How to Use LaseGRBL
Mastering how to use LaserGRBL might seem overwhelming at first, but with practice, it’ll feel second nature. Whether you stick to LaserGRBL or explore options like LightBurn, the world of laser engraving is full of creative possibilities. Remember, every masterpiece starts with a single click of the “Start” button. So, what are you waiting for? Let those lasers do the talking!
